Anda dapat mengonversi OS yang berjalan pada instance ECS Anda ke OS lain yang didukung melalui konsol ECS.
Untuk mengubah sistem operasi, Anda harus mengubah disk sistem dari instance:
- Jika kamu ingin menggunakan Custom Image, lihat change the system disk (custom image).
- Jika kamu ingin menggunakan Public Image, lihat change a system disk (public image).
Untuk detailnya, Anda bisa lihat langsung tutorial di bawah dalam bahasa inggris yang langsung saya ambil dari website Alibaba Cloud, silahkan di coba… kalo ada yang kesulitan bisa tanya jawab melalui Comment.
Replace the system disk (public images)
Procedure
- Log on to the ECS console.
- In the left-side navigation pane, choose Instances & Images > Instances.
- In the top navigation bar, select a region.
- Find the target instance on the Instances page.
- In the Actions column, choose More > Disk and Image > Replace System Disk.
- In the message that appears, read the precautions for replacing the system disk, and click OK.
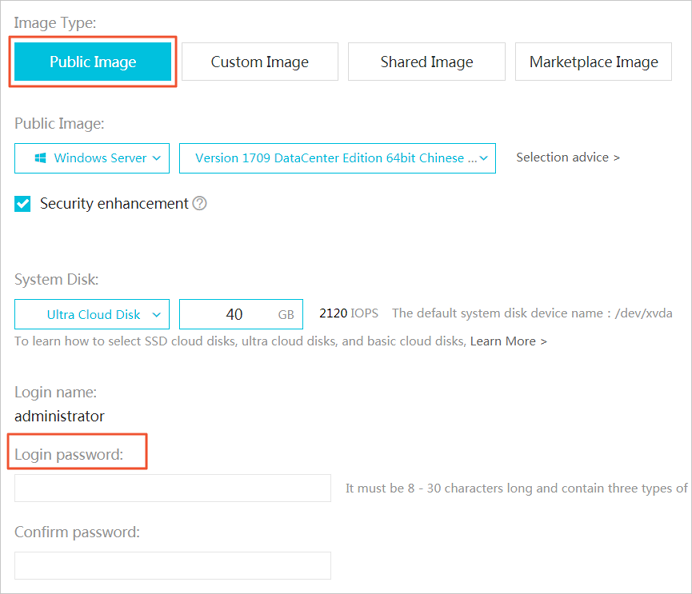
- On the Replace System Disk page, configure the following parameters:
- Image Type: Select Public Image and select an image version. For more information about how to replace an image of the system disk with a non-public image, see Replace the system disk (non-public images).
- System Disk: The category of the system disk cannot be changed. Configure the capacity of the system disk based on your business needs and the new image. The capacity must be greater than or equal to the current capacity of the system disk. The minimum disk capacity depends on the current disk capacity and the image type, while the maximum disk capacity is 500 GiB.

-
- Security enhancement:
- Windows Server instances only support password authentication.
- Security enhancement:

- If the instance is an I/O optimized instance and the operating system is Linux, you can use a password or an SSH key pair for authentication.
- Read and select ECS Service Terms.
- Instance Cost: The fees of the image and the system disk are included. For more information about prices of the system disk, see Pricing.
- Confirm settings and click Confirm to Change.
Result
It takes about 10 minutes to replace the system disk. After the system disk is replaced, the instance automatically enters the Running state. Click the instance ID to go to the Instance Details page to view the replaced image.
What to do next
After the system disk is replaced, perform the following operations as needed:
- Optional. After the system disk is replaced, automatic snapshot policies applied to the original disk automatically become invalid. Therefore, you need to configure automatic snapshot policies for the new system disk. For more information, see Apply or disable an automatic snapshot policy.
- You need to ensure that you have enough snapshot quota to configure the automatic snapshot policies for the new system disk. You can delete the unneeded system disk snapshots of the original system disk. For more information, see Delete a snapshot.
- Optional. Linux only: Write the new partition information to the /etc/fstab file of the new system disk and mount the partitions. Data disks do not need to be
formatted and partitioned. You can perform the following steps. For more information
about specific commands, see Format a data disk for a Linux-based ECS instance.
- Recommended. Back up the /etc/fstab file.
- Write the new partition information to the /etc/fstab file.
- View the new partition information in the /etc/fstab file.
- Run the
mountcommand to mount the partitions. - Run the
df -hcommand to query the file system space and usage.


